I have started to write these essays to get myself back in the practice of writing. I often talk about hand sewing being a practice, writing is also a practice. In 2017 I finished my thesis which interrogated the context of a cap that Martha Washington wore in the Washington family portrait. While that thesis is available for you to read I have more I want to write and am working on turning sections of it into articles. I also want to write a book on hand-sewing. I see this as “early access” to these drafts. If you have suggestions about topics I am writing on or if there is research you are interested to know about I am open to feedback and suggestions.


Charlot’s Cap

The fashion industry in the United States was founded on the use of enslaved workers, hand stitching clothing together and providing the labor necessary to keep shops running. Many of the women who sewed in bondage have been forgotten. This essay seeks to re-stitch a woman named Charlot back into the history of the American fashion industry using my knowledge of sewing and my study of eighteenth-century caps and shirts worn in the Atlantic World.

Like many histories in the US the story of hand sewing has been white washed. Images of Betsy Ross and white women sitting by the fire side spinning has propagated a problematic mythology that industrious white housewives made all of their families clothing. Beyond being untrue, this narrative has erased the labor of skilled free women of color and a large group of enslaved women who sewed in bondage for themselves and their enslavers within the Atlantic world during the eighteenth century. 

Edward Savage (American, 1761-1817), The Washington Family, 1789-1796, Andrew W. Mellon Collection, Open Access Image Courtesy National Gallery of Art, Washington, D.C. (1940.1.2).

Collections of historical garments survive from the eighteenth-century Atlantic World. Because of survival bias these collections skew towards garments worn by wealthy, white colonizers. Unlike silver, a garment was not labeled or marked by its maker during the eighteenth century. While many of these garments were worn by white colonizer’s the stories of dyers, weavers, laundresses, and enslaved seamstresses are also held in the seams.

As part of my Master’s thesis I contextualized the cap worn by Martha Washington in the portrait “The Washington Family.” One of my questions was — who made it? Because there were 317 enslaved people at Mount Vernon in 1799 I thought it likely that an enslaved woman had a hand in the sewing.

As I read through letters between Martha Washington and Fanny Bassett Washington, Charlot and a woman named Caroline jumped off the page. In these passages Charlot’s skill was being described. Her enslaver writes on June 5, 1791:

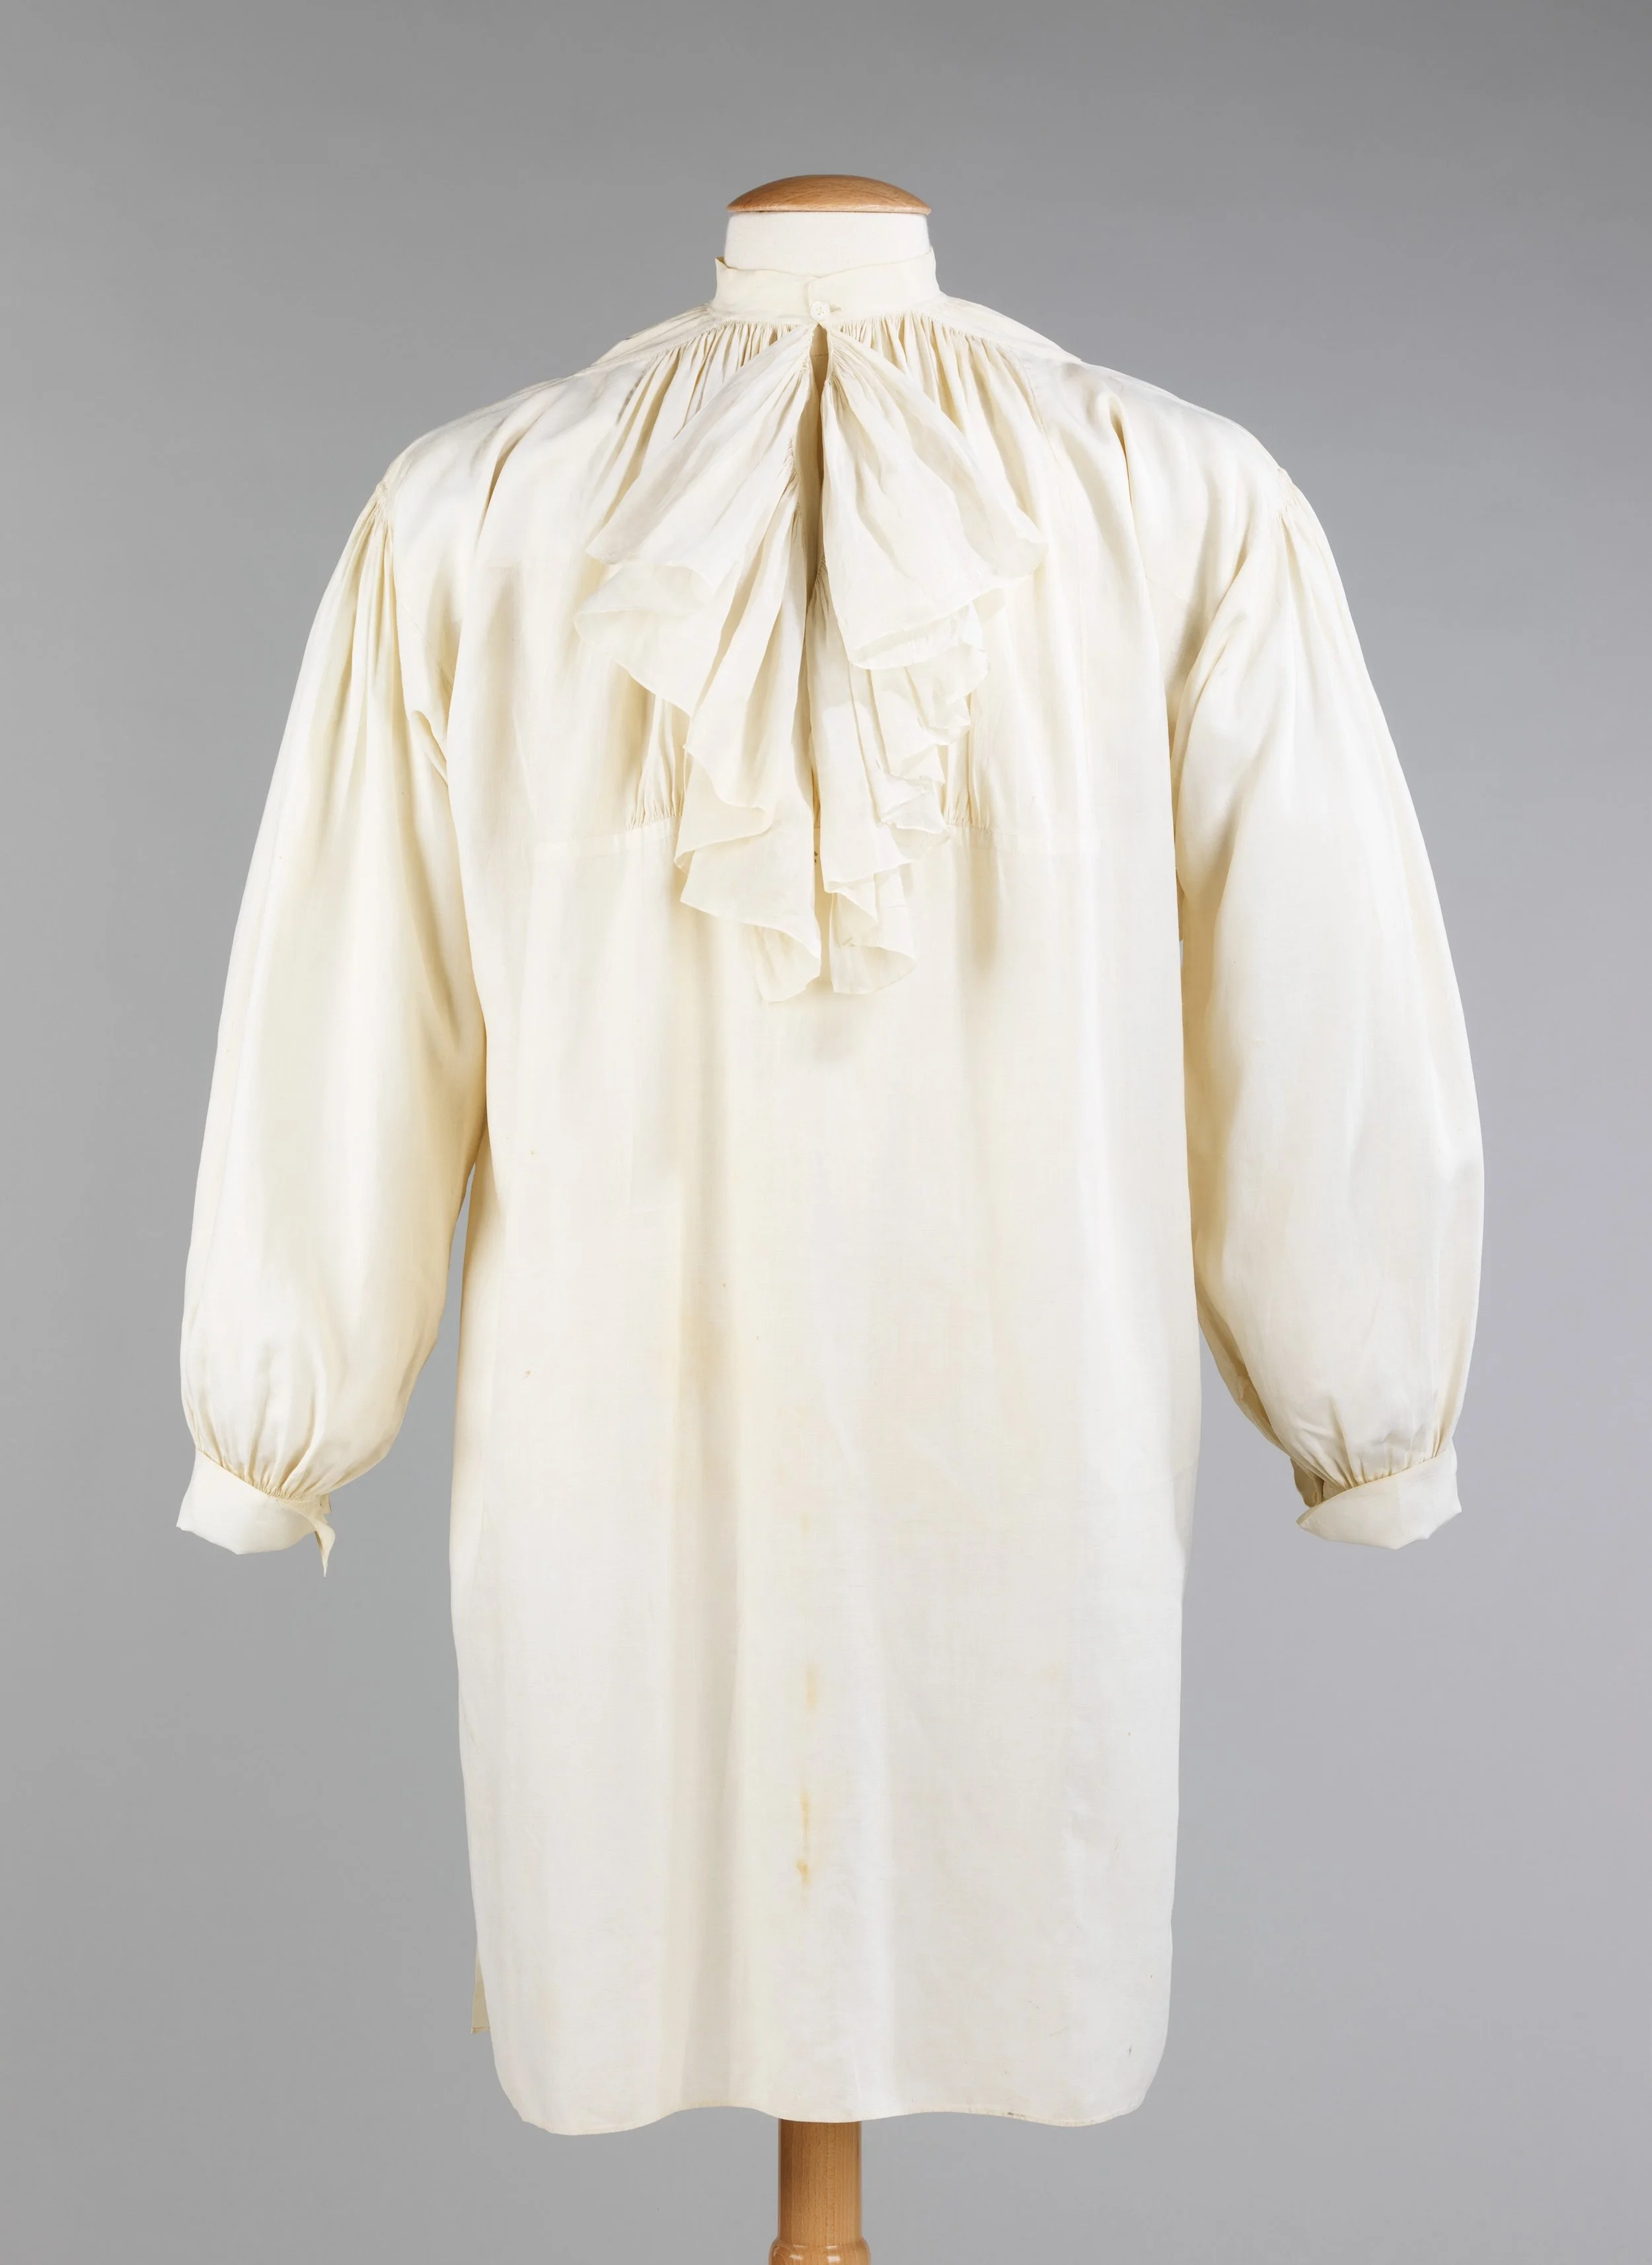
“I sent by Hercules some rufles for my little Boys bosom [ruffles] which I beg you will make Charlot hem…”

Later in August 29, 1791 she complains:

“I wish you’d had them whipped [i.e. whip-stitched and gathered]--it was but little more trouble for Charlot, they cannot be sewed on the wristbands till they are whipped--”

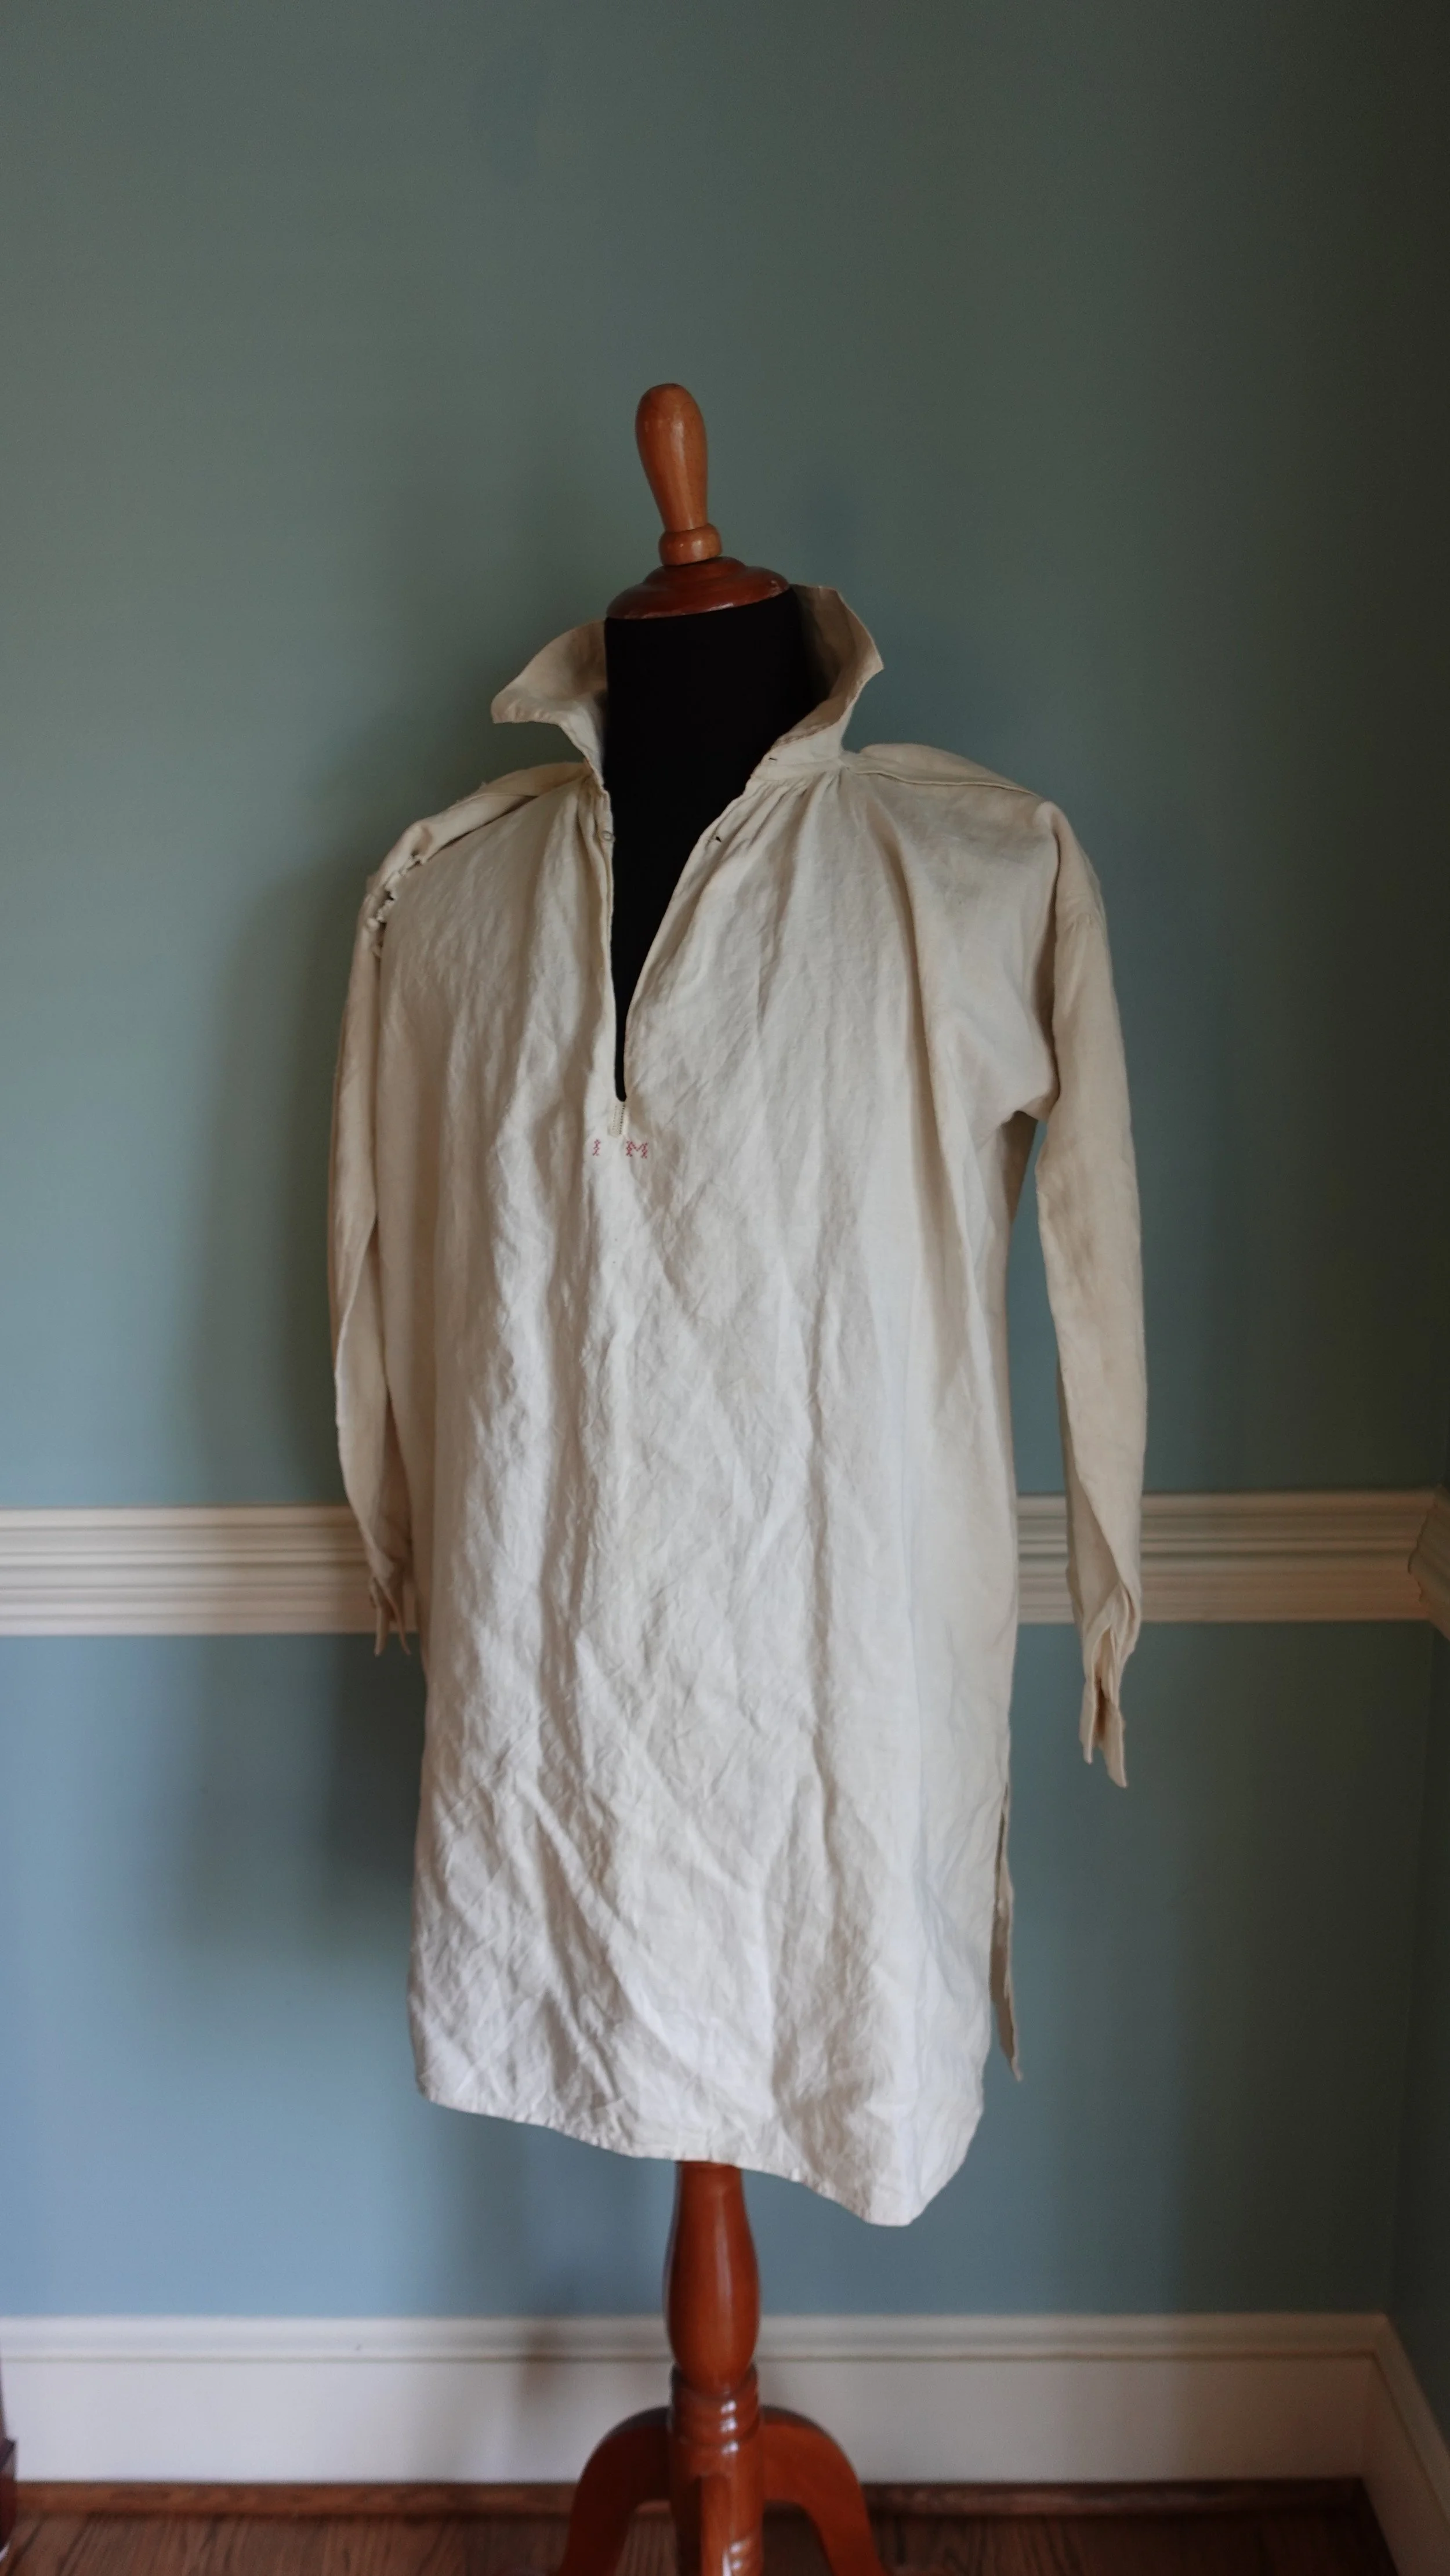
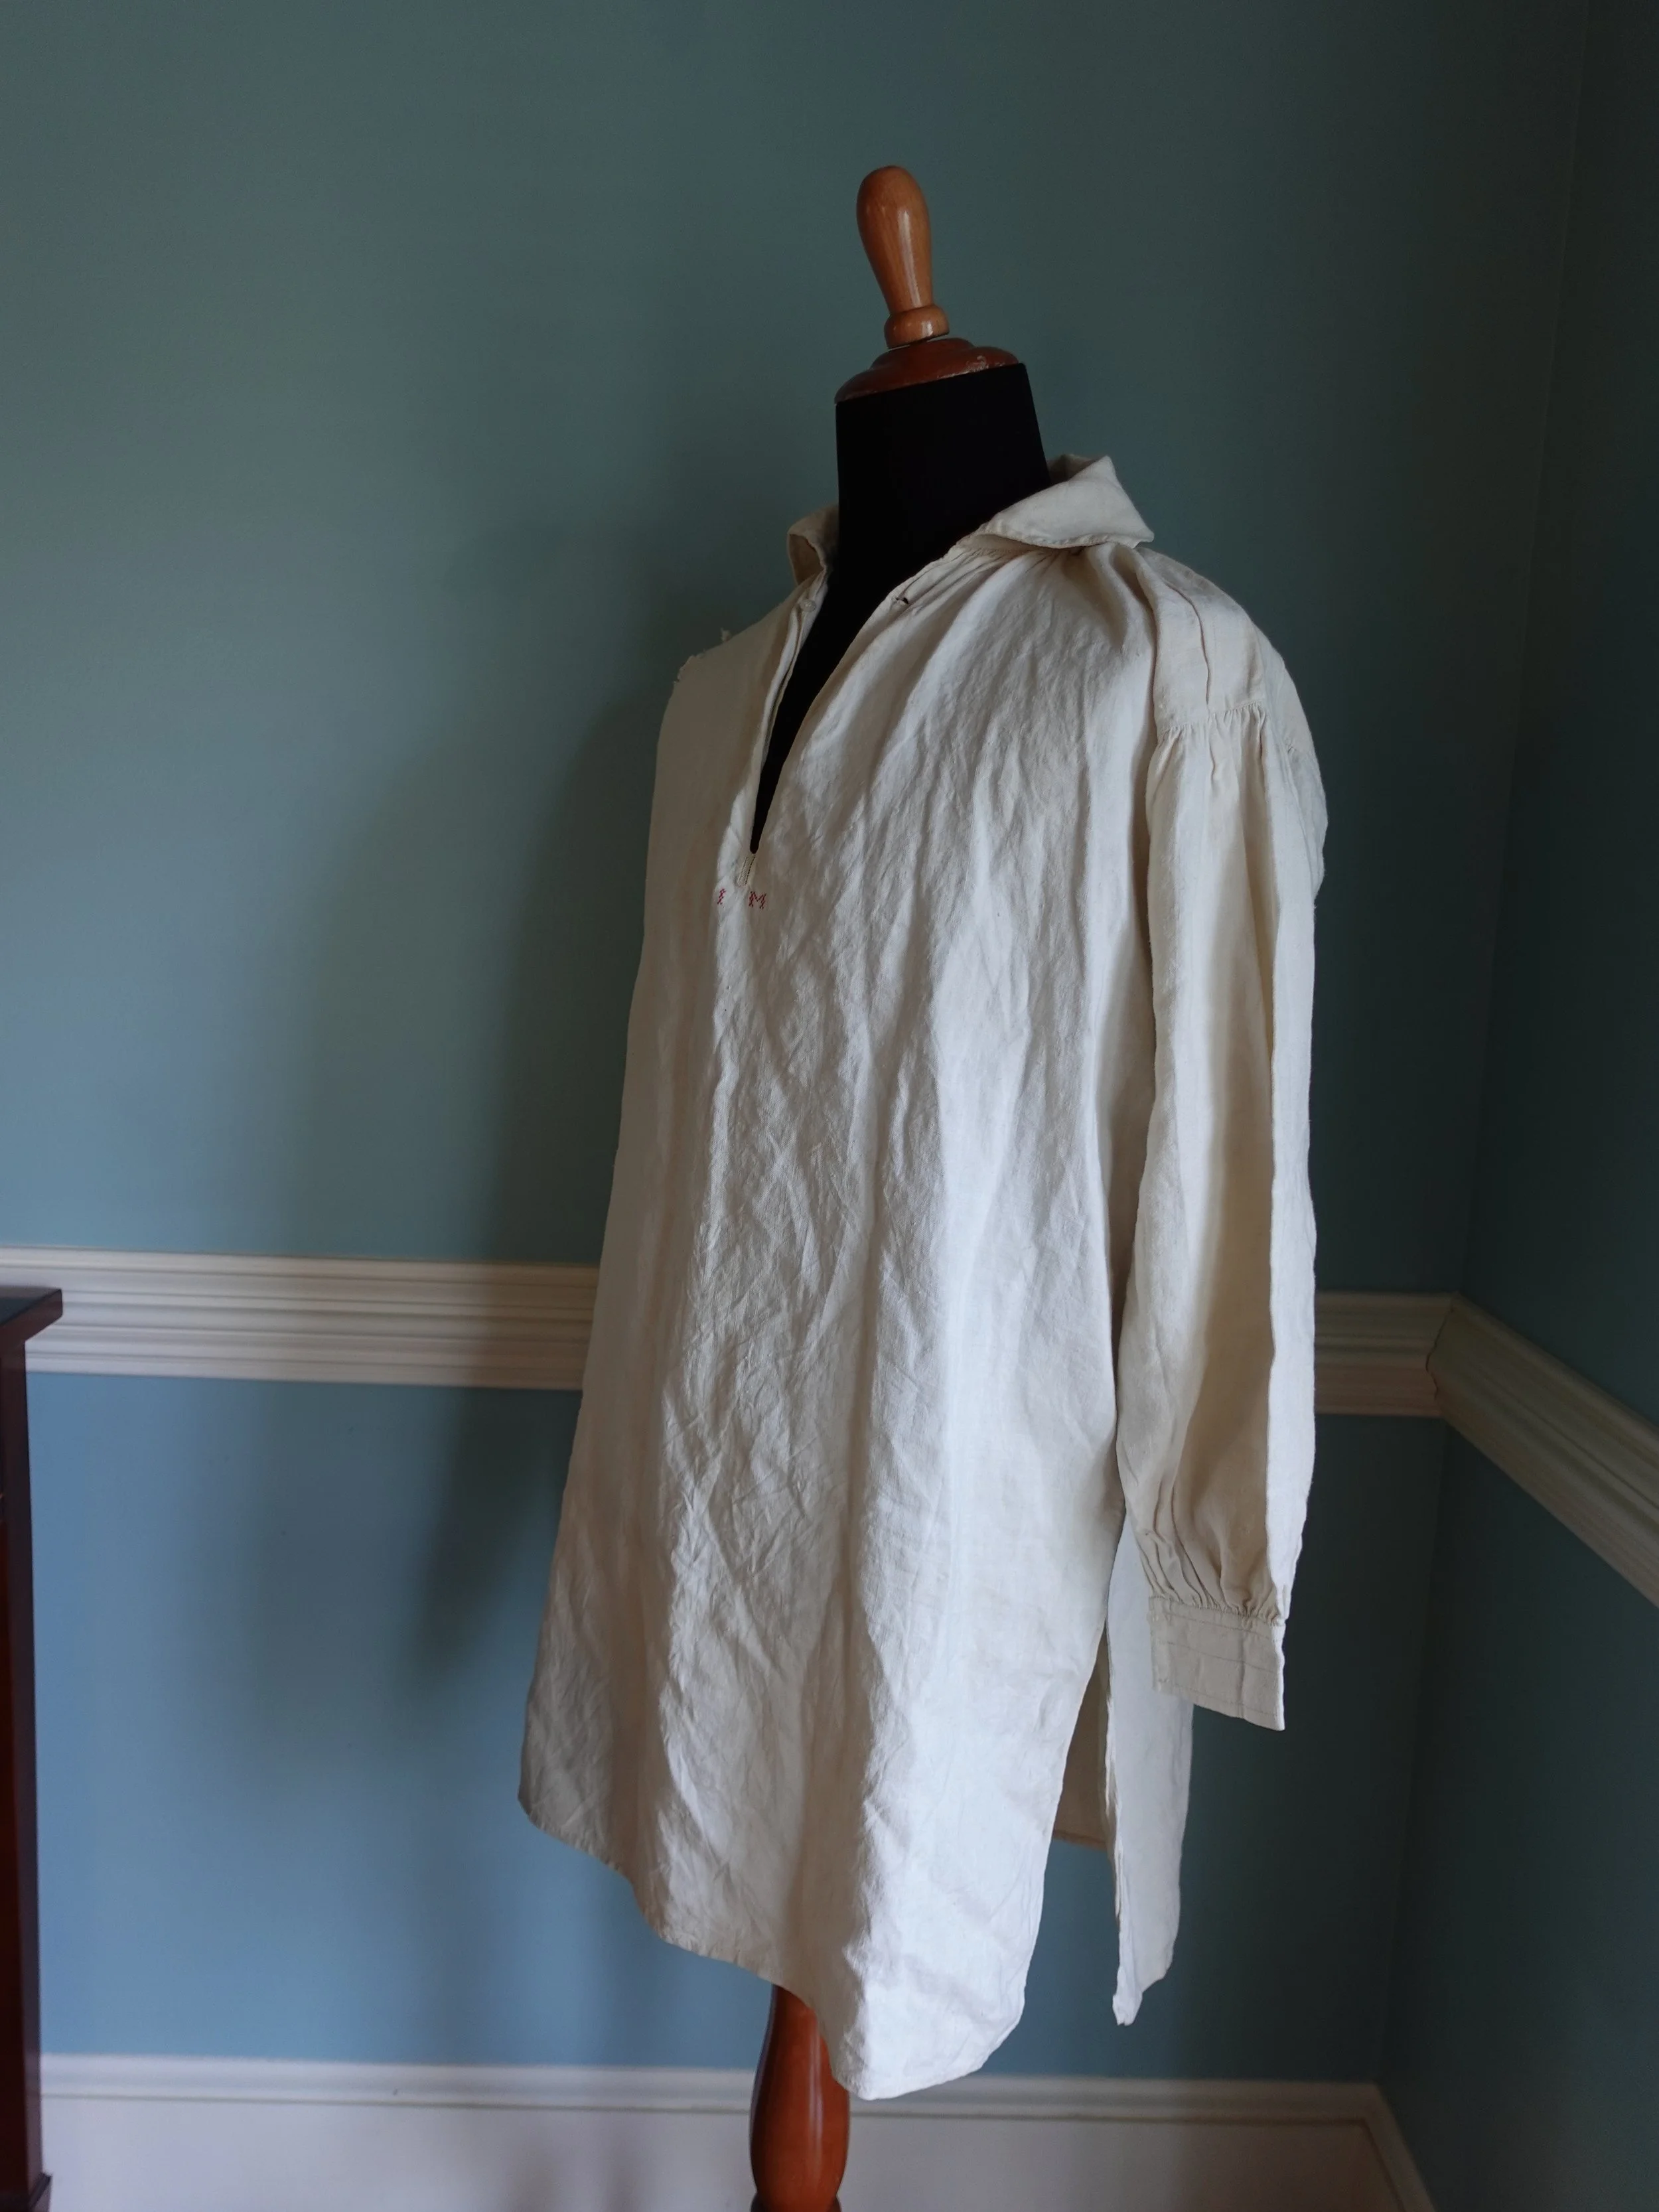
Shirt with bosom ruffles. Metropolitan Museums of Art, Shirt, 1790, 2009.300.62.

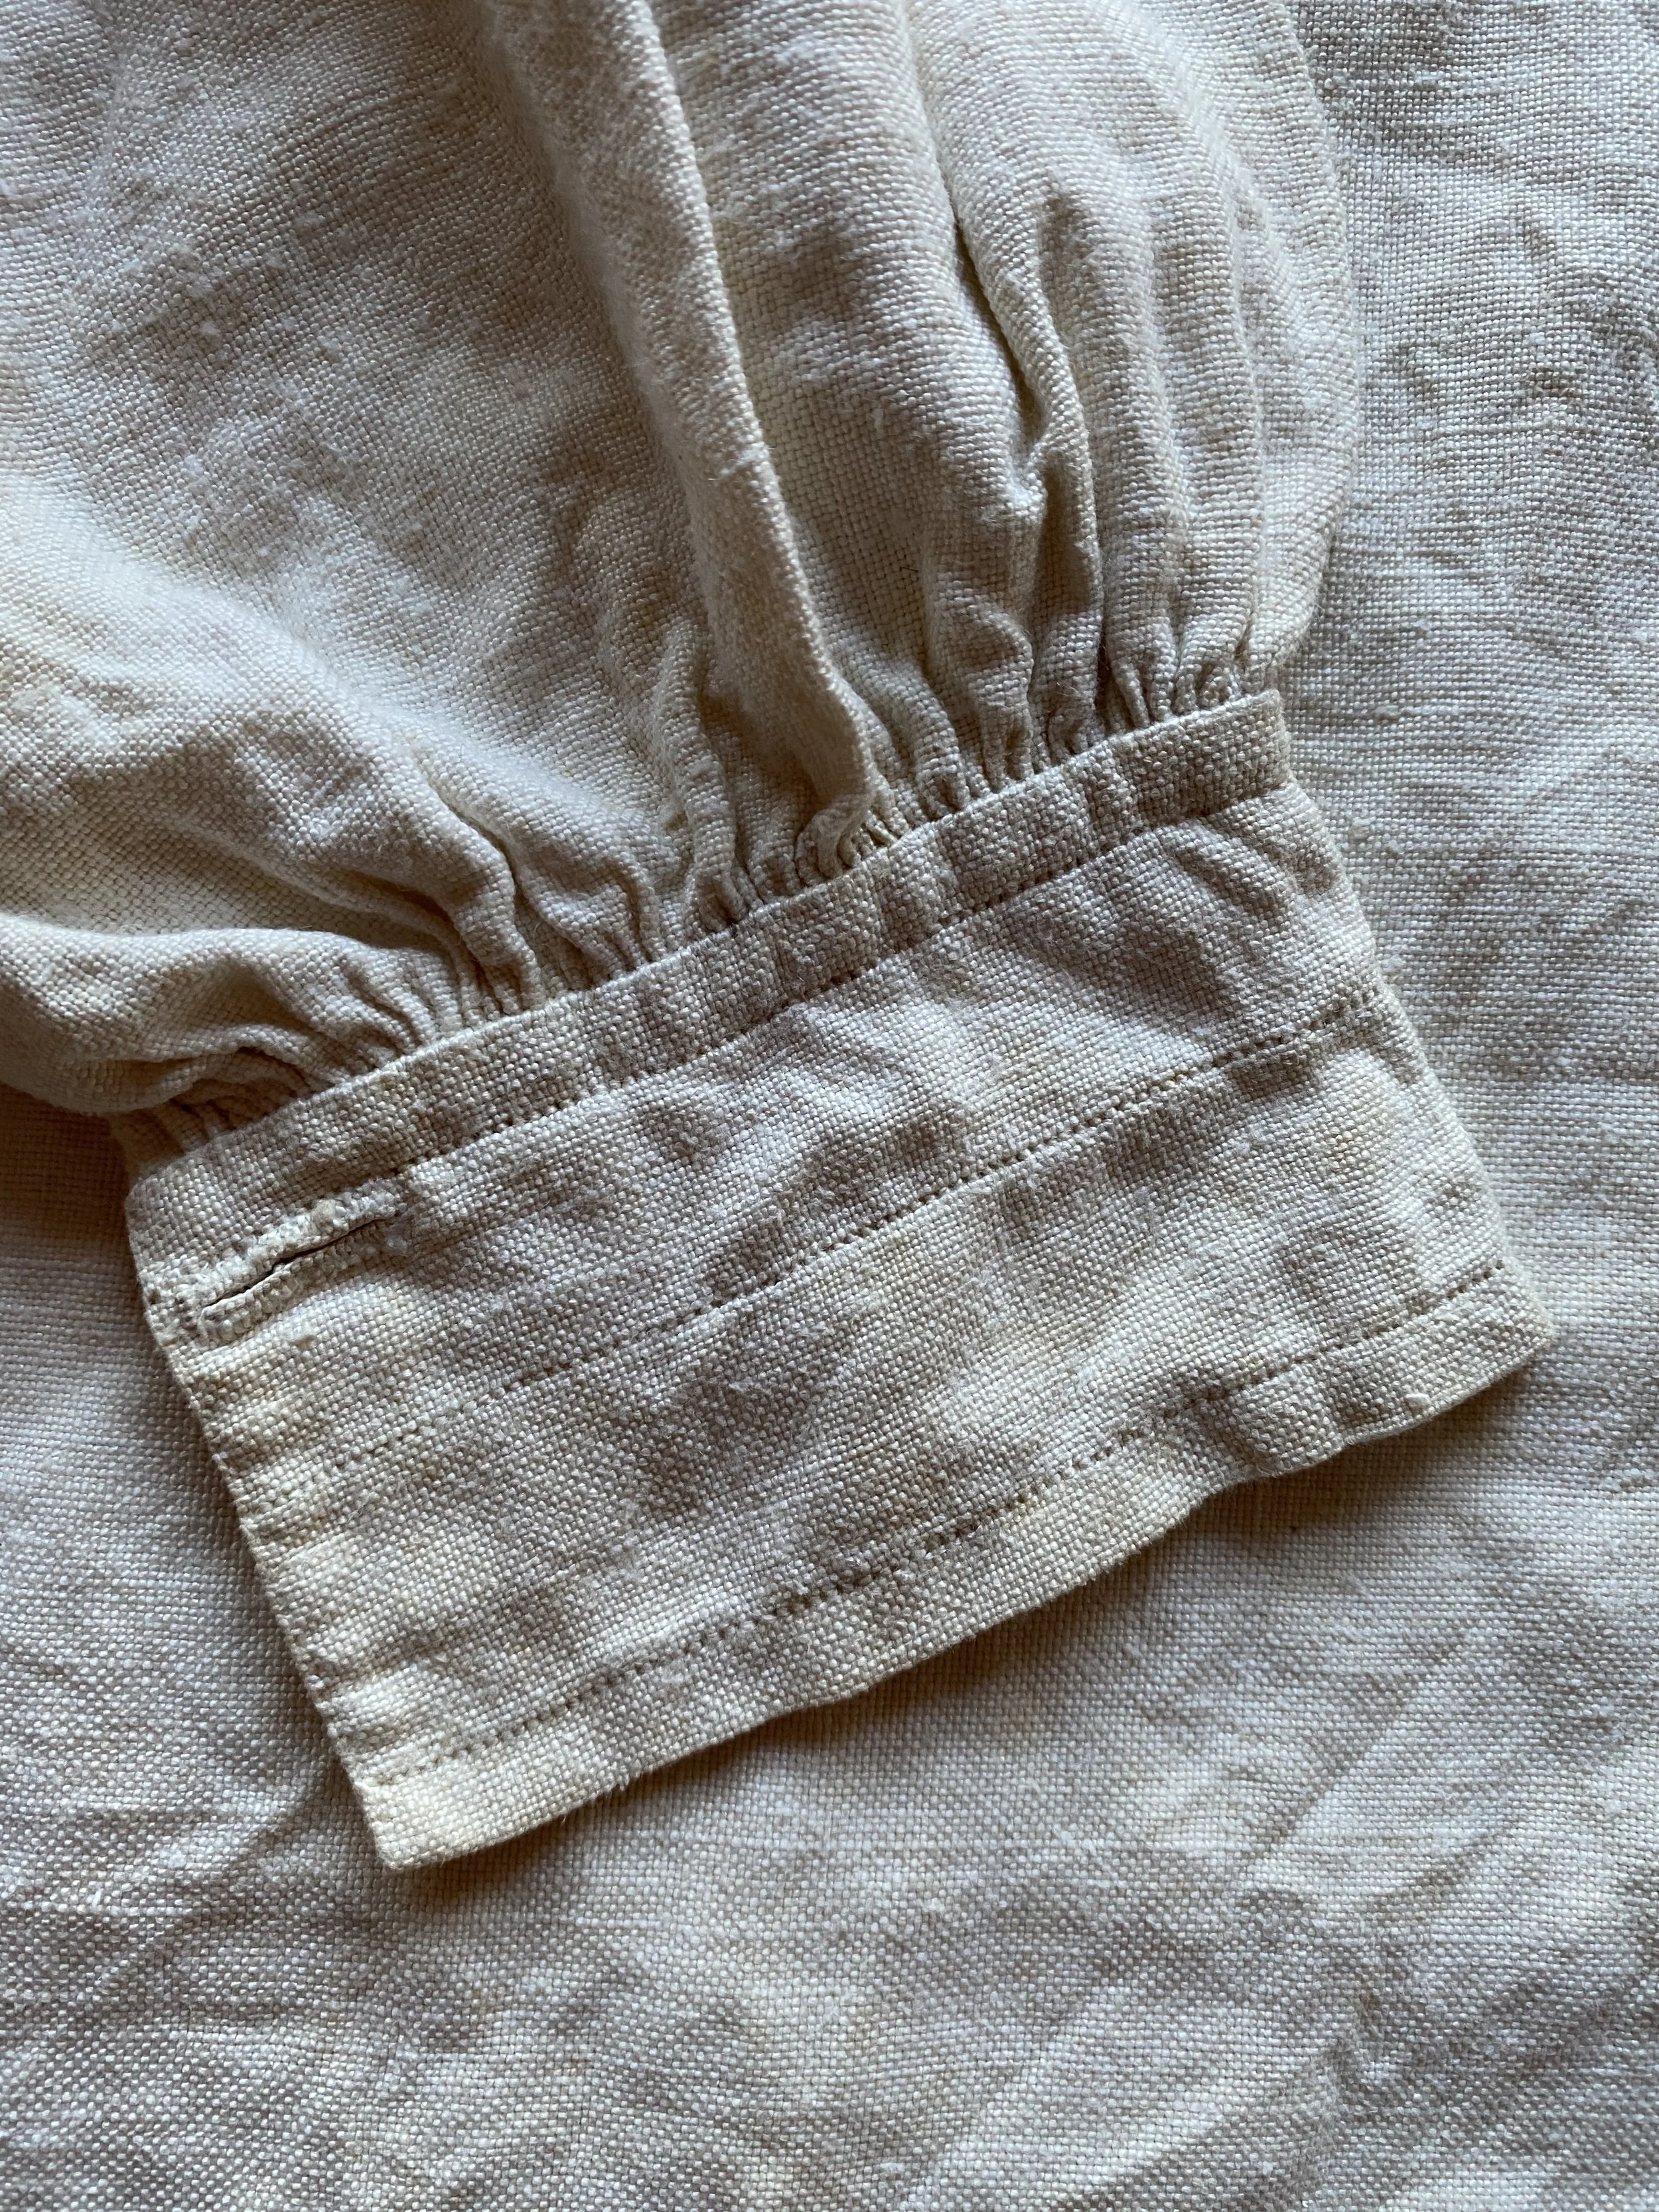
Cap with caul, band and border labeled.

Through my own ‘hand sewn literacy’ I understood what was being described. Charlot could hem fine textiles and was being forced to whip ruffles like the ones you see in the shirt above. This technique is also used in cap making to gather and attach the caul and the border (see left image). Remarkably, a cap that looks very similar to the cap in “The Washington Family” portrait is held in Mount Vernon’s clothing collection. I had the opportunity to study this cap.

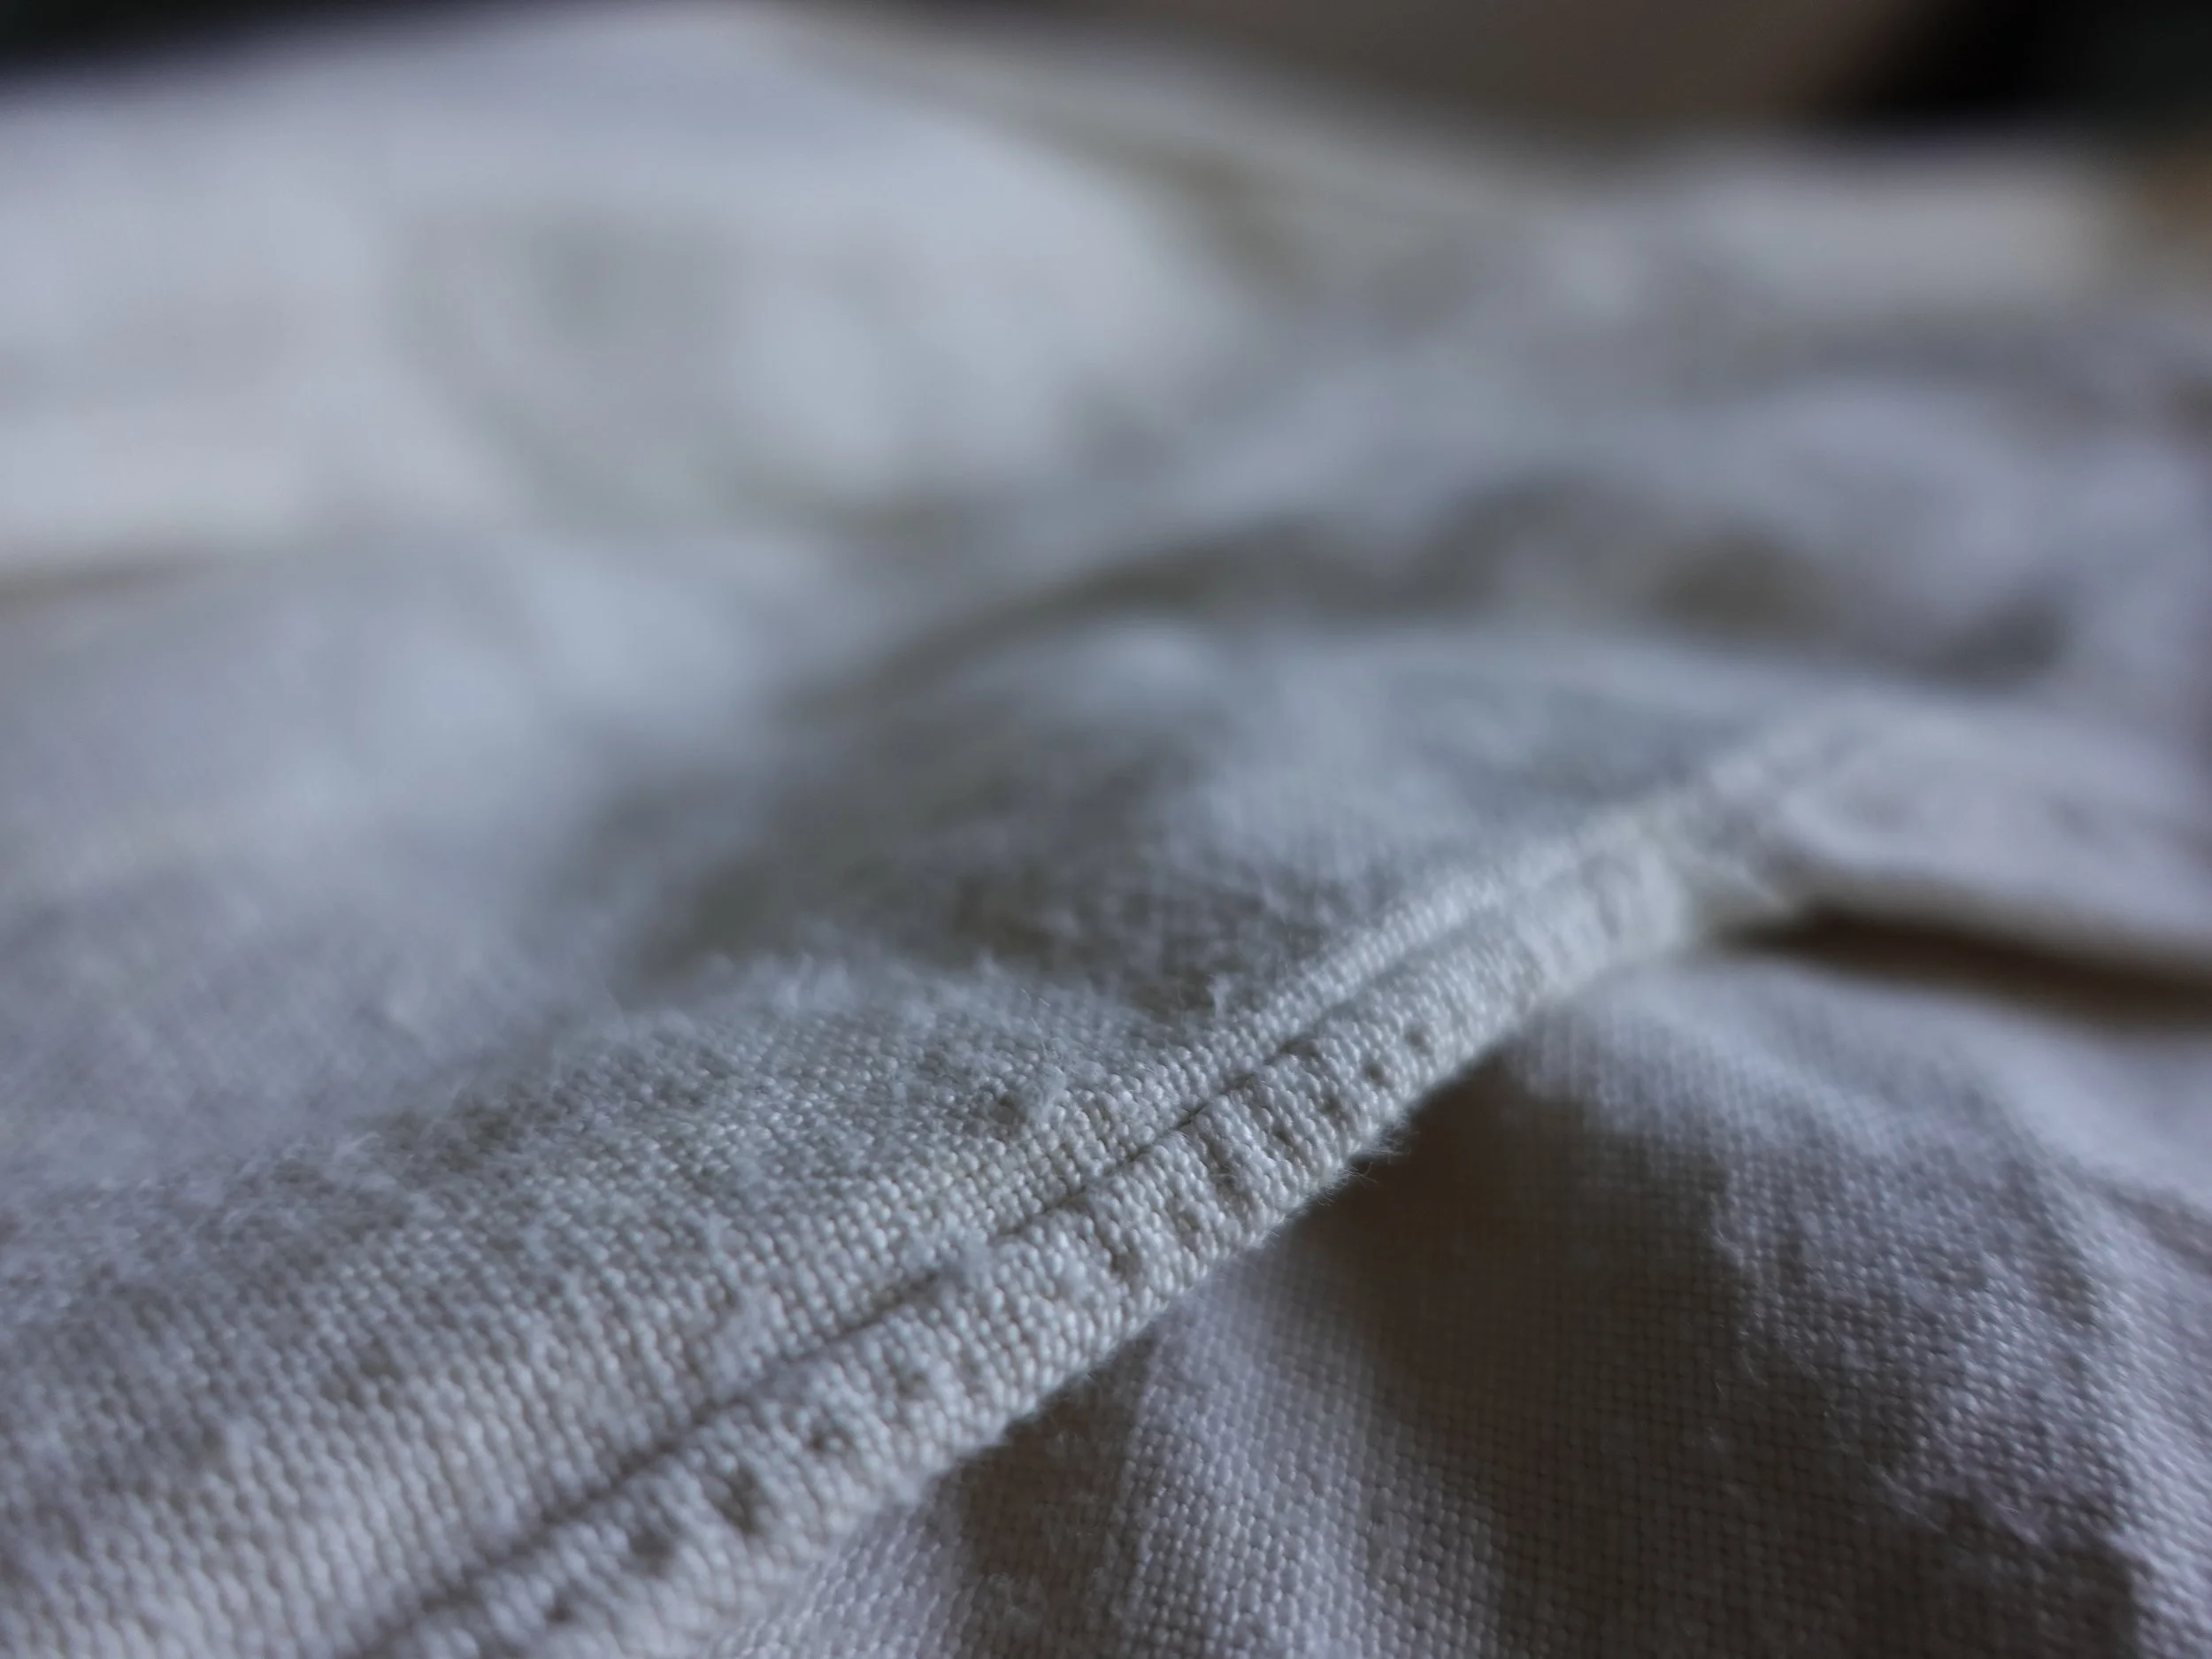
Caul attachment to headpiece detail. Cap, Courtesy of the Mount Vernon Ladies’ Association (W-608). Photograph by Sarah Woodyard©. (For more images of this cap go to my thesis here pp. 127, 131, 132 )

(Detail) Edward Savage (American, 1761-1817), The Washington Family, 1789-1796,

Andrew W. Mellon Collection, Open Access Image Courtesy National Gallery of Art, Washington, D.C. (1940.1.2).

Above you see a detailed view of the crown of the extant cap. The ribbon in the image on the right is separate and would cover this section. Notice how the fabric is gathered. This is created by cutting a larger piece of fabric and using a whip-gathering technique to control the excess material down to a smaller section- in this instance the band. This is the same technique described to whip the bosom ruffles.

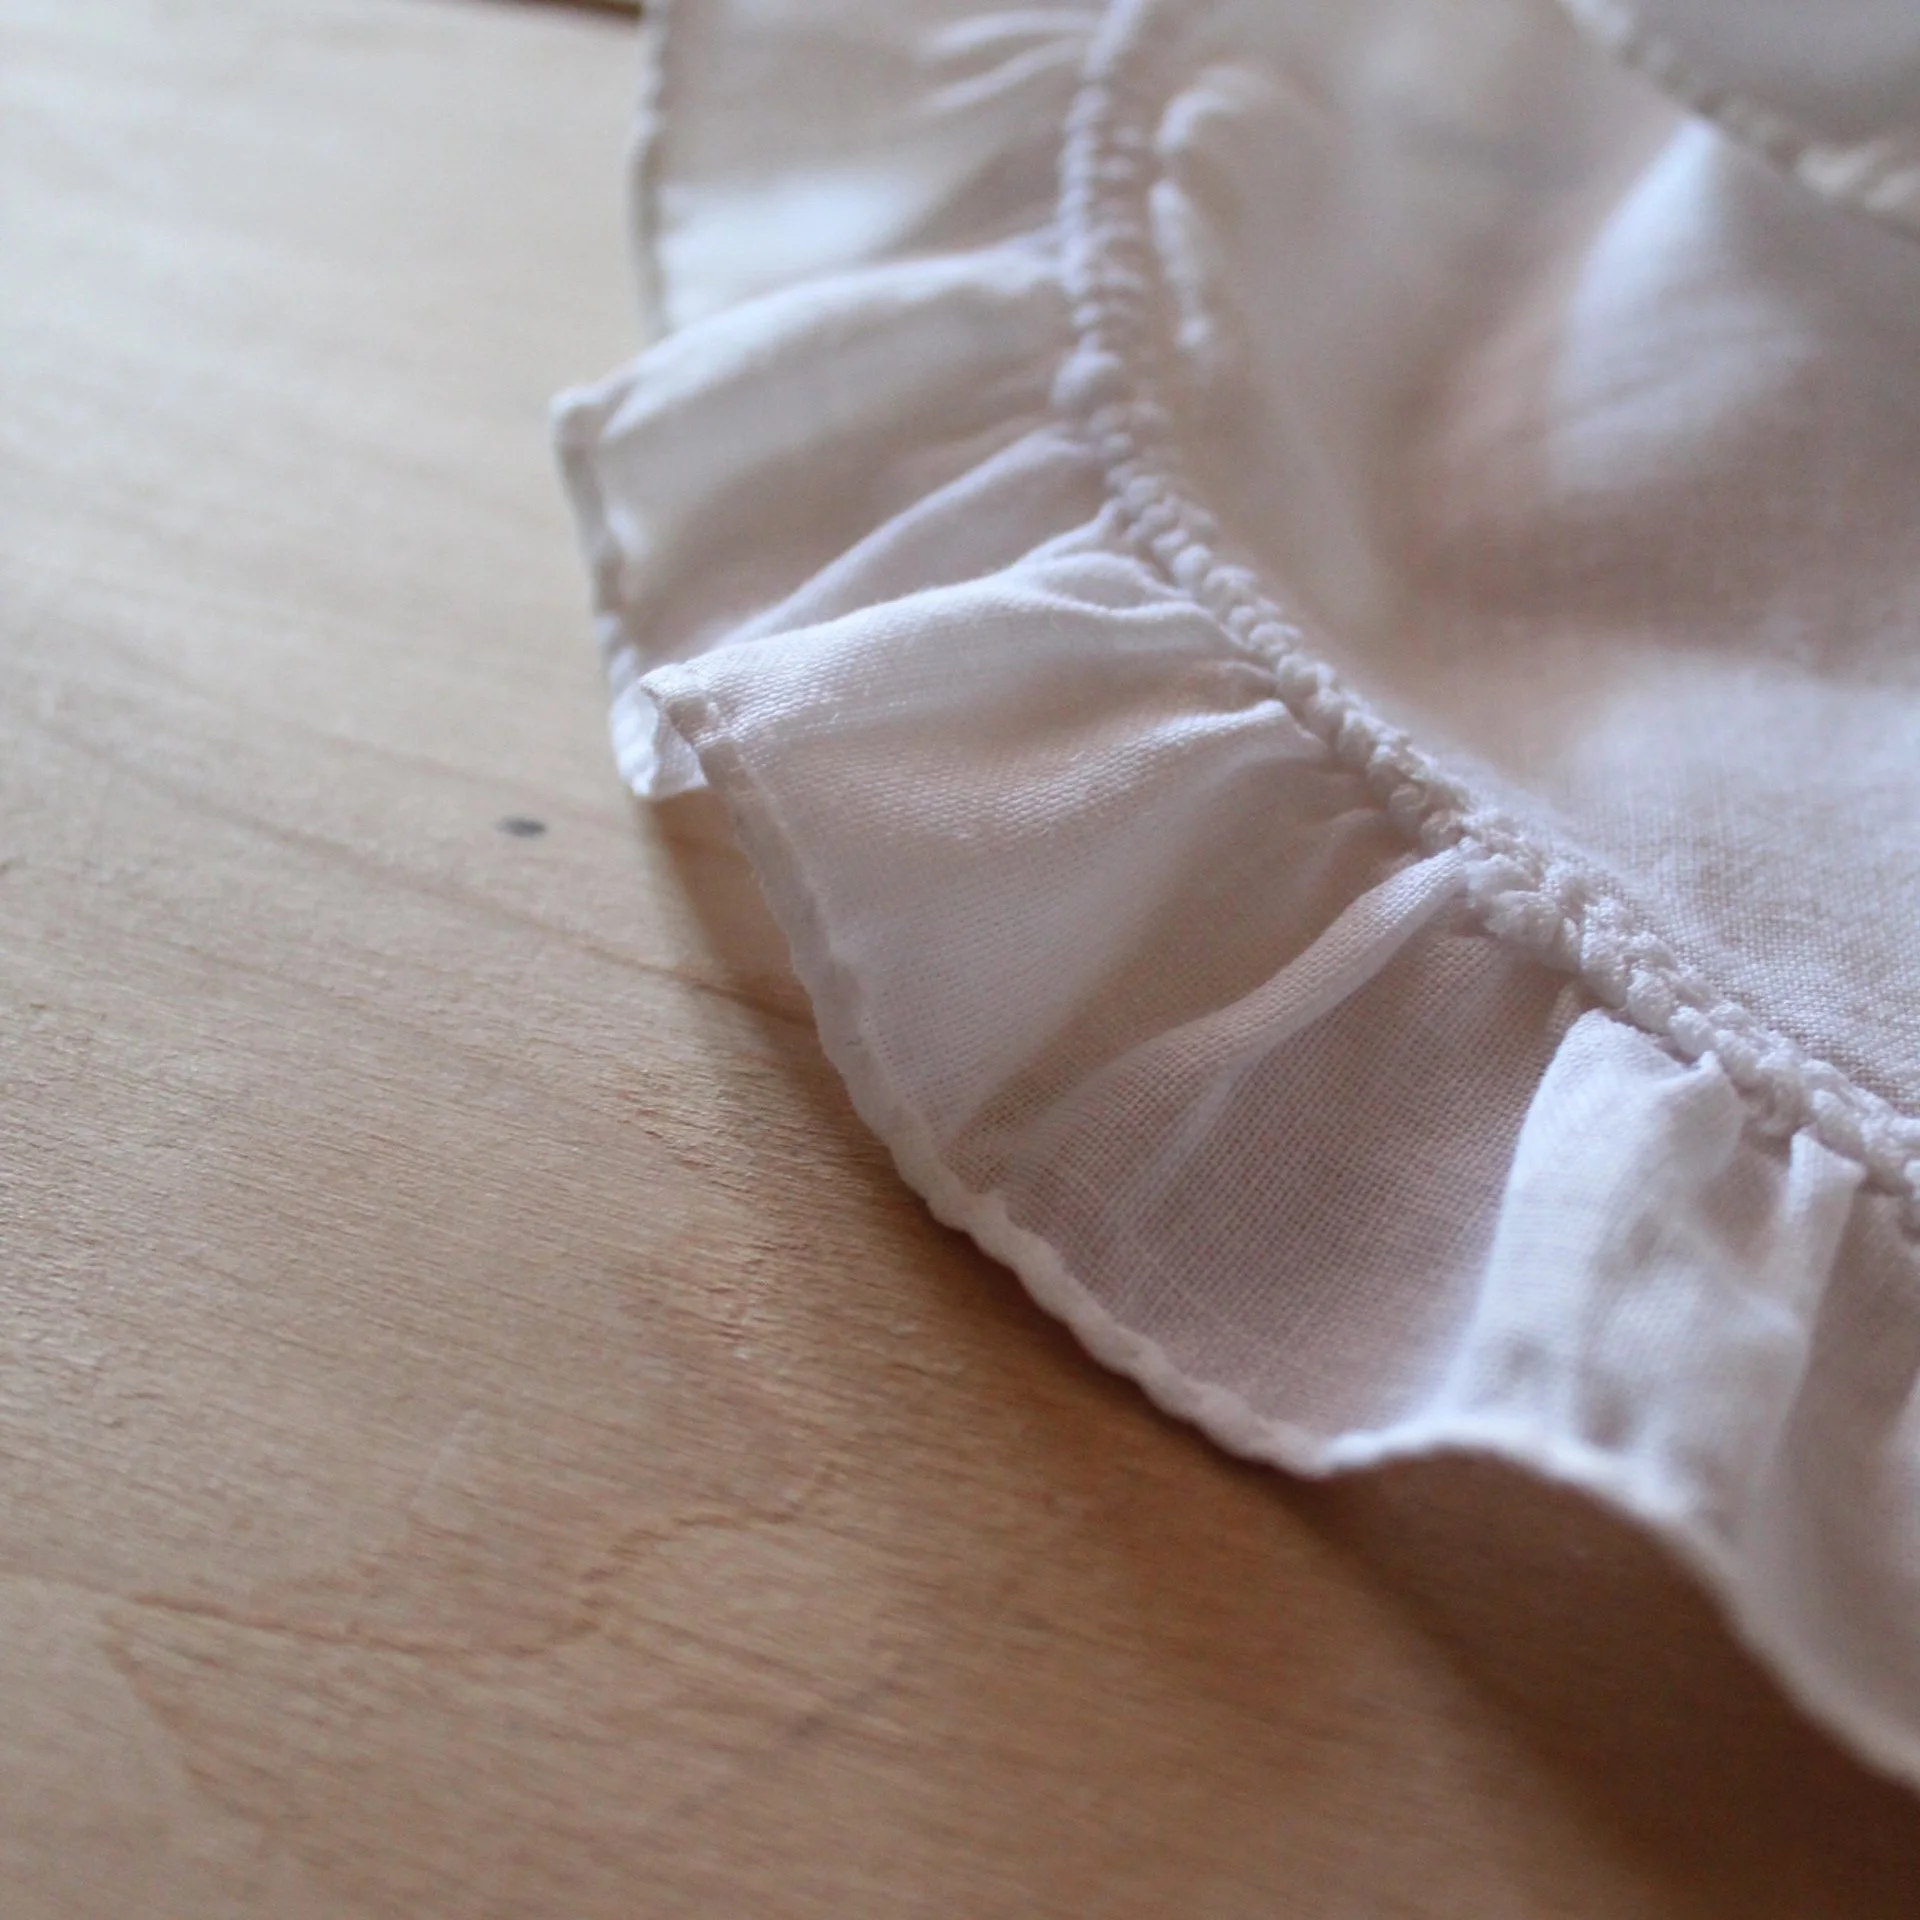
Detail of whip gathering.

Through my own sewing practice I was able to see Charlot within the context of her enslavement. Charlot could very well be the woman behind-the-seams of this cap that was used by her enslaver Martha Washington to craft an iconic American image eclipsing Charlot and other women like Caroline and Oney Judge. But now we can see Charlot— her skill and her humanity. Forcing us to hold the beauty of her sewing within the brutal context of her bondage.

I often wonder what skills and life she would have had outside of slavery. Would she have taken the skill and made it paid work like Elizabeth Keckley; a formerly enslaved seamstress who bought her freedom and became Mary Todd Lincoln’s dressmaker? Would she have turned her back on it to escape her bondage physically and spiritually?

Slavery still exists in the United States (and Global) fashion industry, let us honor Charlot and not perpetuate this system. Seek out more stories of women like Charlot in extant eighteenth-century hand-sewn clothing. This is why context with sewing matters— there is always a person behind the seams.

Further Reading:

Fashioning the Self

Black Designers in American Fashion

Database of Mount Vernon's Enslaved Community

Consumed: The Need for Collective Change: Colonialism, Climate Change, and Consumerism

 Stitching Art into Life: Recreating Susan Winchester’s Cap, c. 1817.

Susan Winchester, ca.1817 by Ralph EW Earl, Cragfont.

Photo: Sarah Woodyard.

What have I been working on? A lot of lace and tiny hems to say the least! In this photo essay I wanted to bring you along my process of recreating a cap from a portrait from Tennessee c. 1817.

I was invited to join the grant “TN Wars Commission Grant: War and the Homefront 1812 - 1865 Through the Material Culture of Clothing” by Tonya Staggs, Executive Director, Historic Castalian Springs. I recreated the cap and the chemisette seen in this portrait of Susan Winchester that hangs in the hall at her home Cragfont. My involvement to bring these garments to life was only a part of the grant. My husband re-created a set of clothing seen in Susan Winchester’s husband, General Winchester’s, companion portrait. Another maker re-created clothing to represent an enslaved individual at Cragfont.

While they do not know a lot about the enslaved community— it is imporant to acknowledge these individuals are seen in these portraits too. Through the labor they likely contributed to maintaining the Winchester’s clothing, to the wealth their labor generated to have the portraits made and maintained. Thinking about the portaits as part of these enslaved individuals visual landscape is also part of these objects story. The portaits currently reside in the main hallway, at the end of the hall is a set of stairs that leads down to the kitchen where an enslaved woman cooked. If the portraits hung in the hall in her lifetime she would have walked by them multiple times a day. For more information about the site go here: https://www.historiccastaliansprings.org/cragfont

I had the opportunity to visit Cragfont and see the portrait in person, as well as a tintype of Susan as an older woman. (To my delight she was wearing a cap in the tintype too!) Seeing a portrait of her younger self and then the image of her as an older woman was very humanizing. That is one of the reasons I am drawn to making clothing for museums and why re-creating a garment worn in this portrait was such an interesting project for me. A 2D painting keeps you removed from the person painted but a tangible 3D object that is almost within reach— it breaths life into the material landscape. Clothing is so personal, having a tangible object on display is like the person just stepped out of the room. I find it to be a very effective way to tell a story. While there are many layers to this project, for this essay I will bring you along on my process taking the cap out of the portrait and on to my needle.

Detail: Susan Winchester, ca.1817 by Ralph EW Earl, Cragfont. https://www.historiccastaliansprings.org/cragfont

Photo: Sarah Woodyard.

Tonya and I brainstormed what each component could be. The material of the cap could be netting or a lightweight cotton. The little spots could be embroidery or it could represent lace or just highlights. There appears to be a separate border at the front that could be fabric or it could be lace. And there appears to be a smaller crown at the back of the cap with a band of trim around it. As I studied this cap I was also thinking back to other historic caps I have studied from this time frame. We settled on using fine cotton for the border and body of the cap and interpreted the lines with the dots as lace insertion.

Textiles: While we were in Nashville I stopped into Textile Fabrics to see what fine fabrics they had on the shelves. They have a lovely section of heirloom sewing textiles. I found a cotton organdy that had a really good body to it. I thought this would work nicely for the ruff on the chemisette and the cap. I wanted to match the cap and the ruff textiles. I was also mindful about making a garment that would be easy for the museum staff to maintain. Historically, this cap would have been washed and starched— it is unlikely they were going to do this so starting with a stiffer material would give the body to the garment without the need for maintenance.


Detail: Workwoman’s Guide. p.124

Patterning: I had never seen a cap like this before so I went down the research rabbit hole to look for caps like it in contemporary portraits, online collections and fashion prints. Oddly enough, I could not find a cap like the one in the portrait in these sources. Then I cracked the pages of the Workwoman’s Guide. This guide was first published in England in 1838. You can read and reference it here. On page 124 under figure 4 was a drawing of a cap that had the crown with a pleated trim around it (!!) And to the left of this illustration is the patterning diagram for this style. On p.125 were the instructions for how to pattern this “Morning Cap.” Thank goodness for the Workwoman’s Guide. They use nails as a unit of measure in this book so I needed to convert to inches. A nail= 2.25”

Detail: Workwoman’s Guide. p.125. Instructions on how to pattern out the Morning Cap.

Pattern drafting shapes. You are looking at the side of the cap.

The patterning technique in the book has you draw a rectangle of a specific dimension to establish points and then plot points inside of the rectangle to create the shape of the cap. The curves are drawn freehand by connecting two points. I referenced the line drawing in the book and mimicked the shape of the curve they drew in the diagram. For the crown you just draft out a circle. This circle corresponded with the curve of the crown. However, it did not have to be the exact size of the crown since the crown opening was gathered down to fit the circle.

I drafted the pattern and tried it on but it was a wee too small so I went back and added some width to the back of the cap. It took about three tries of pattern adjustment and trying on to get a good shape that fit my head.

Body and crown of cap. This is the cap folded over the top of the head. The face opening is on the left side, the neck is the bottom, the center back is the angled portion to the right and the crown is the curve that connects the top of the head to the center back. The circle is the crown.


Pinning lace to the cotton organdy. For full lace insertion tutorial go here.

Lace: The first step for me was to do the lace insertion on the body of the cap. The lace I chose was “French Val lace” from Imported Laces. It is a lace that is designed to be used for insertion. This means it has two finished edges so fabric can be stitched to both sides of the selvedge. I have created a tutorial walking you through the steps I used to stitch the insertion lace here.


Sewing the cap:

Each strip of lace is carefully measurement and then felled down.

All the pieces of lace felled into place. This oddly looks like a yoke for a bodice. To orient you: the top of the head is the shortest piece of lace. The u-shape is where the crown will be inserted. The soft curve that is parallel to the bottom of the image is the face opening laid flat.

Detailed view of felling back the cotton for insertion. Here is the tutorial for lace insertion.

I used these vintage needles. For a lot of garment construction I like to use a sharps because they are a little longer but for this project I needed a slightly shorter needle. A between/quilters needle was the perfect length. I ended up using 3 needles. It was important with the lace and fine fabric the needles were always very sharp. I used a size 8-10 in this pack of antique needles.

Once the lace was inserted I hemmed all the way around the body of the cap at about 1/8”/ 4mm. I did not hem the curve because the center back seam had more lace to be stitched to it and the crown section was going to be whip-gathered in place.

I hemmed the circle. While I am very happy with how the lace insertion came out, I am the most proud of this tiny little circle. Hemming on the bias is extremely difficult and I was very pleased with this result. I used a tiny running stitch and you can see how I pulled the running stitch a little bit around the curves to ease in the bias. I used this technique because I have seen small running stitches used like this to control the bias on antique caps.

Detail of the circle set into the crown. I whip-gathering the curve at the the back to gather it to the right dimension of the circle and then whipped the circle to the gathers. The line of lace you see extending down from the circle is a piece of lace I attached at the center back to close off the crown. I chose to put this lace at the center back because I have seen this done on antique caps.

Inside of crown whip-gathered into place.

Body of cap finished! Next was attaching the borders (ruffles) to the front of the cap and around the bottom. And the pleated trim around the crown.

This is the finished cap with all the borders and trim added. You can see the amount of fabric that was gathered across the front of the cap. What I do not have pictures of are the yards and yards of rolled hems I did for the borders. The front of the cap has a border that was made with 90” / 225 cm piece of fabric that was folded over on itself to make a double ruffle. So that is 180” / 450 cm of rolled hems on that border alone. The folded section was then whip-gathered to the front of the cap.

Detail of the border whip-gathered around the bottom of the cap.

Detail of the pleated trim going around the crown. I used knife pleats and topstitched them down.

Center back of the cap.

Top and front of the cap. If you ever make a cap you have to put ribbon on it. That is something people often forget. However most caps had some form of ribbon decoration. Notice the saw-tooth edging. This is seen in the portrait and is seen in Western fashion in the 18th and 19th centuries on edges of ribbons.

Maggie with her ribbon.


This is some of my fabric type of sewing, small delicate stitching. Most of the time spent on this cap was rolling hems and then whip-gathering. In total the cap took about 30 hours of work. Now that I have made this version I would be interested to make another version with embroidered netting. A lot of caps from this time period were made from netting. That is the benefit to making a piece like this, you learn as you go. And in the end its a bit of an art project mixed with an experiment. I look forward to seeing this cap on display bringing this portrait to life.

https://www.historiccastaliansprings.org/cragfont

https://www.historiccastaliansprings.org/the-enslaved-community-of-cragfont


Following the Thread: Pulling Threads for Hand-Sewing


“See that the edges of the work are perfectly even before turning down, which should be done to a thread, unless the work is not cut straightwise.”

“The Workwoman’s Guide,” By A Lady, 1838. p. 1.


A shirt cut out on the worktable.

The opening line of the English sewing manual, The Workwoman’s Guide tells the reader to pull threads when cutting straight lines. The priority placement of this statement underscores how important and how prevalent this practice was for cutting out geometric pieces. This opening sentence also touches on a subtle but important concept: how you cut out a garment directly impacts the construction method. More specifically, how a precise pulled thread can impact hand-stitching.

I have been thinking a lot about the symbiotic relationship between pulling threads and hand-sewing. This was spurred on from my teaching of the Historic Hand-Sewn Shirt Class with Tatter Blue last year. In the past, I took it for granted I should pull a thread, it was just what I did when I cut out geometric pieces. Teaching these techniques to modern makers who had never pulled threads, underscored how integral to the process this technique is for hand-sewing on the grain line.

In this essay I return to the shirt that started this train of thought and explore the relationship of the shirt’s cut and construction.


“There must be considerable saving where the mistress of a family cuts out, or, at least, superintends the cutting out, those articles which require calculation and exactness…”

“The Ladies Economical Assistant, or The Art of Cutting Out, and Making The most useful Articles of Wearing Apparel” By A Lady, 1808. page vii.


The cost of clothing in the 18th and 19th-century Atlantic World was primarily the price of the fabric versus the labor to hand sew a garment. Knowing how to precisely cut out fabric without waste was a skill valued among consumers. As is quoted above, the cutting of shirts might have been done by a housewife, a housewife overseeing the cutting, or the job of someone disconnected from the household. On page IX in the English 1789 sewing manual, “Instructions for Cutting Out Apparel for the Poor…” author J. Walter stresses you can waste a lot of money “without consulting others, whose particular business it may have been, how to cut [shirts] out…” This distribution of labor was done by both free and enslaved workers across the Atlantic World. Up until the late 18th century these skills were taught through experience and passed down from one skilled cutter to another. In the late 18th-century, pattern books began to be published, demystify the cutting out process.

Plate 17. The Workwoman’s Guide.

The above diagram of “SHIRTS FOR THE LABOURING CLASSES” in Plate 17 in “The Workwoman’s Guide” demonstrates the math and ingenuity that went into cutting out shirts. On page 137, the author explains why these diagrams are important. The author educates the reader that “shirts for laboring men are generally made of the stout linen called shirting-linen…” this linen “should be chosen of exactly the proper width, according to the size wanted; and as it is an expensive article, especially cut to waste, six scales are drawn upon the plate for six different sizes of shirts, by which the most economical plan for cutting the shirt is seen.” The author drew these diagrams with economy in mind and also created a scale so you could cut out six of the same size shirt. The entire width of the fabric was used for the body and the rest of the yardage used to cut out collars (C), gussets (G), sleeves (S) and other smaller pieces of the shirt. The diagram shows how to layout these smaller pieces. Each of the lines represent where the cutter would remove a thread from the weave structure of the fabric to create perfectly straight lines.


“…if the shirts are made of linen, they should always be cut by a thread…”

“The Workwoman’s Guide,” By A Lady, 1838. p. 138.


It is clear why cutting precisely helps the consumer spend responsibility, but it also aids the stitcher to sew a well-stitched shirt. All the pieces are cut on the grain-line, meaning that the weave structure of the textile is on a grid. This causes the shirt to hang in a stable manner and allows the stitcher to stitch along the grain line to create beautiful details. Let us examine the cuff, felled seams and shoulder detail of the shirt to see how pulling a thread and sewing on grain affects the stitchers ability to sew precisely and beautifully.

This cuff detail really demonstrates my point. Notice how the cuff is a precise rectangle and the edges of the cuff are folded along one thread, along the grain line. The stitcher took advantage of the grain line by folding the fabric back perfectly on-grain and stitched it to the stroke gathers. The evenly spaced top-stitching is done by following one thread along the grain and counting over the threads. The buttonhole was cut in-between one thread and then stitched around the slit. The visual resonance of this cuff is created because the cutter pulled threads. The geometric nature of the cuff acts like a guide to the stitcher, making it possible to easily fold and stitch on the grain.

Above is a flat-felled seam. The left image shows the inside of the seam and the right image shows the exterior. Notice how the seam line is parallel with the grain line. You can see in the right image how the backstitches were done by following a thread across the seam and the raw edges were folded along one thread along the grain and felled down. Again— the precise pulling of threads act as a map for the stitcher to easily sew with precision.

Above is the shoulder seam. You are seeing the shoulder strap folded back on the grain line and stitched to the gathered sleeve. Notice how straight the shoulder strap is and notice the perfectly straight topstitching on the strap. While all of this sewing looks almost impossible, planning ahead and carefully pulling threads make this possible.


How a garment is cut out impacts how you sew it together. We can glean a lot from this shirt to inform historical practice, an understanding of past makers process and to be better makers in 2022. I hope this essay provided you with another way of thinking about cutting out clothing for hand-sewing, fabric cost and waste. The next time you plan to hand-sew a garment that has straight lines think about following this thread and pull a thread first.

Want to give it a try? Follow along with this tutorial or take the Hand-Sewn Napkin class. This class teaches you how to pull threads and hem with precision. It is in the Patreon Workshop library for Workshop and Silver Thimble tiers or you can find it on my site here. I will also be teaching this live on August 13th in Lexington, VA at Make It Sew VA. Sign up here!

What is a Mantua-Maker??

Photo: Fred Blystone

In 2015 I became a Journeywoman Milliner and Mantua-maker. Having served a seven year apprenticeship in millinery and mantua-making from 2008 to 2015 at the Margaret Hunter Millinery Shop in the Historic Trades Department at the Colonial Williamsburg Foundation.

During my apprenticeship my full-time job was learning and practicing the trades of millinery and mantua-making while educating a visiting public. I made clothing for programming that was used as a static museum display, worn by museum staff and purchased by private customers.

In 18th-century Virginia free and enslaved hand-stitchers were a huge part of the labor force working as seamstresses, tailors, milliners, mantua-makers, laundresses and ladies maids, to name a few. Mantua-making was one out of many trades working to clothe 18th-century people. While basic sewing was seen as a life skill, mantua-making was considered a trade. Overall, mantua-making was not a hobby (unless you were rich) and the labor prices were low enough that most women, free and enslaved, utilized the skill of a mantua-maker.

So, what is a mantua-maker?

The Book of Trades, October 23, 1804 / Ladies Dress Maker. Google Arts & Culture.

The 1804 English Book of Trades describes the work of the mantua-maker: “The business of a mantua-maker, which now includes almost every article of dress made use of by ladies, except, perhaps, those which belong to the head and the feet, is too well known to stand in need of description. The plate is a representation of a mantua-maker taking the pattern off from a lady by means of a piece of paper, or of cloth. The pattern, if taken in cloth, becomes afterwards the lining of the dress. This business requires, in those who would excel in it, a considerable share of taste, but no great capital set up in it unless to the act of making is united the business of furnishing the materials.”

Virginia Gazette. Purdie and Dixon. October 24, 1771. pg. 2

In 1771 Margaret Brodie advertises she “makes and trims in the newest taste, sacks and coats, gowns and petticoats, all sorts of ladies brunswicks and jesuits dresses, and sultana robes, robedecores.” These are different styles of upper and lower body garments that were fashionable in London and in Williamsburg, Virginia in 1771. Essentially a mantua-maker was responsible for cutting fitted upper body garments for women, like gowns and jackets; and lower body skirts, like petticoats. She was not called a dressmaker yet, but that is the best modern term to describe her work. Brodie advertised she learned of the newest styles every three months. A mantua-maker had to be quick on her feet and change with the styles. There was a demand for fashion and fashion was not stagnant. These changing styles were achieved through new clothing but also through the remaking of old clothing. A mantua-maker often made clothing with the expectation that she would be cutting a garment apart and remaking it after a couple of years.

Linen lining of a gown. The two outer sections are the two front bodices and the middle section is the back bodice. The straps are the shoulder straps and they will be fit to the back bodice to create the armhole.

As the definition describes above, one of the hallmark skills of a mantua-maker is the ability to cut out and fit a lining around your customers’ figure in a three dimensional manner. The shape of the lining will be predicated on the shape of the stays (18th-century support garment and predecessor to the corset) the customer is wearing. This structured bodice creates the silhouette that the lining fabric can be laid against and pinned to the stays without hurting the wearer. Then the mantua-maker takes a medium size set of scissors and removes material around the waist, the neckline and the underarm. When these curved sections are cut they have a bit of a stretch and snap into place around the figure.

Mantua-making is a skill that is learned through practice and experience. It is not inherently hard but it does require practice, patience and a trained eye to fit and form. It is an intuitive way to cut and fit a bodice. It is a very personal way to make clothing because your customer is right in front of you and providing feedback. If you have ever laid muslin on a dress form or around a customer to make a toile, then you have used a similar technique. Draping is the modern equivalent to mantua-making.

While I can describe the process, watching it is the best way to understand mantua-making. My friend Samantha Bullat is a talented costumer at the Jamestown-Yorktown Foundation (JYF). Last year they published a video of her making a gown for her co-worker Sarah. I have no affiliation with JYF and did not have a hand in making this video but it is a good illustration showing how the shapes are cut around a customer. Important time stamps:

Pleating and fitting the back fabric 7:05-8:23

Cutting the front lining off her customer 8:23-8:35

Cutting the outer fabric using the lining as a pattern 8:44- 8:50


One of my favorite projects during my apprenticeship was making clothing for women who worked in town doing physically demanding jobs. I loved collaborating with my co-workers and making them clothing that suited their work and allowed them to do their jobs better. Aislinn (pictured below) is a journeyman blacksmith and she needed her clothing to have exceptional range of motion. Below you can see the finished gown and what the shapes of the bodice looked like flat after I cut them around her. Cutting the sleeve close to her arm and setting it high under her arm gave her the ability to hammer, file and pull the bellows. Fitted clothing does not mean restrictive clothing. Aislinn’s gown is a great example that a gown was not inherently fancy. What made clothing fancy and expensive was the textile chosen by the customer. A customer typically bought their fabric first and brought it to their mantua-maker. The labor was always a minimal cost in comparison to the fabric.

Aislinn’s work gown. This is made out of a striped linen and lined with a checked linen. Linen is safe choice when working with fire. It will smolder before it burns. These fabrics would have been very cheap in the 18th-century. Making a gown like this affordable for a blacksmith. From left to right: one bodice back with its lining, one front bodice piece, one shoulder strap with lining, a sleeve cut on the cross grain.

Aislinn at the forge. The gown gave her fantastic range of motion!

It is important to remember that this type of cutting was done at a time when hand-sewing was the way clothing was constructed. The back-in-forth process of cutting a bodice, doing some sewing and then returning to the fitting works extremely well with hand-sewing. Some styles call for the bodice linings to be whipped together and the outer fabric topstitched to the lining. Sewing on curves and sewing from the outside lends itself beautifully to hand sewing.

While I have only done a little bit of mantua-making over the last several years, the intuition of cutting has really served me well. I feel very comfortable cutting out a garment without using a paper pattern (to be honest I prefer it). Apprenticing as a mantua-maker was an education in understanding a trade that laid the foundation of the couture industry. Through recreating the techniques of mantua-makers from 250 years ago it also gave me a glimpse into their embodied experience. It was also a study in self-trust and an intuitive approach to cutting out clothing. Like hand-sewing, this mantua-making requires repetition and practice but once you learn to cut intuitively you can make anything.